Friday, January 31, 2025

Fix External Hard Disk I/O Device Error with Stellar

 Summary: I/O device errors are a frequent cause of data loss in external hard drives. This guide explores their common causes, provides nine DIY solutions, and explains why professional data recovery services are essential for handling physically damaged drives.

Stellar Data Recovery - I/O Device Error

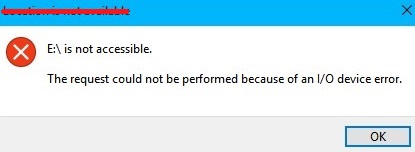
An I/O device error occurs when the computer is unable to access a connected drive. This issue often triggers the following message:

“The request could not be performed because of an I/O device error.”

I/O Device Error

While these errors may seem alarming, they don’t indicate an immediate risk of permanent data loss. This guide provides detailed steps to resolve I/O device errors and explains how you can handle situations where fixes aren’t successful.

इस पोस्ट को हिंदी में पढ़ने के लिए यहां क्लिक करें।

What Is an I/O Error?

An I/O (Input/Output) error occurs when a system encounters a problem while attempting to read data from or write data on a connected device. Essentially, it signals a communication failure between the computer and the storage medium.

This error is not exclusive to external hard disk drives. It can affect a wide range of storage devices, including internal or external HDDs/SSDs, USB flash drives, SD cards, and CDs/DVDs.

Before going through the methods to resolve an input/output error, let us understand the underlying causes behind these errors.

Main Causes of I/O Device Error

The most common causes of I/O device error in hard drives are:

  1. Faulty USB port
  2. Loose connection wires
  3. Driver issues
  4. Drive letter conflicts (OS Problem)
  5. Incompatible format in HDD
  6. Physically damaged hard disk drive

Any combination of the causes listed above could lead to this message getting displayed: “The request could not be performed because of an IO device error.

Additional Reading: How To Fix Hard Drive Not Recognized Error

How To Fix I/O Device Error?

In this section, you will find nine methods to resolve the I/O device error and access your hard drive. The methods, listed in increasing order of complexity, fall under the subheadings: simple hardware fixes, driver updates, Windows tools & utilities, and advanced methods.

Step 1. Simple Hardware Fixes

1.1: Check Connections and Power Supply

I/O device errors are often caused by faulty or loose connections. If your external hard drive is connected via a USB hub, it may not be receiving adequate power. Disconnect the drive from the hub and connect it directly to your computer.

1.2: Try a Different USB Port or Cable

If the error persists, eject the drive, restart your computer, and reconnect the drive using a different USB port. If you suspect a faulty cable, replace it with a new one, which can be easily sourced online or from local stores.

1.3: Test on Another System

If the input/output error persists, it’s prudent to test the hard drive on a different PC or laptop. This step helps confirm whether the issue lies with the drive itself or your current system.

Step 2. Driver Updates

2.1: Reinstall or Update USB Drivers

Outdated or corrupt USB drivers can cause I/O errors and make your external hard inaccessible. To update your USB drivers, follow these steps:

  1. Hit the Windows key and type  Device Manager  in the search box.
  1. Open Device Manager and scroll all the way down to  Universal Serial Bus controllers .
  1. Navigate to your external hard drive in the list and right-click on it. Your hard drive may be listed under names like “USB Mass Storage Device,” “External Drive,” or simply the brand name and model of the drive.
  2. Click on  Update driver  and let the computer check for any new drivers.
  1. Restart your computer and check to see if you can access your storage device.

2.2: Update SATA Controller Drivers

To update SATA drivers, we follow the same process as USB controller driver updates.

  1. Open Device Manager and locate the section labeled   Storage Controllers .
  2. Double-click on the entry labeled  SATA Controller  to open its properties.
  1. In the  Properties  window, navigate to the  Driver  tab.
  2. Click on  Update Driver .
  1. Select  Search automatically for drivers  to allow Windows to check for updates online.
  1. Once the updated driver is installed, restart your computer and check if you can access the hard drive.

When using a USB-to-SATA adapter, the USB side connects to the PC’s USB port, while the SATA side connects to the external hard drive. Hence, unlike in pen drives, both USB and SATA controller drivers have to be updated in external HDDs.

Step 3. Windows Tools & Utilities

3.1: Change IDE Channel Properties

If your I/O device error persists, changing the IDE channel properties may help resolve the issue. Follow these steps:

  1. Press Windows + X and select  Device Manager  from the menu.
  2. Expand  IDE ATA/ATAPI controllers  to view the available channels.
  3. Right-click on the channel where the affected drive is connected (typically the secondary IDE channel) and select  Properties .
  4. Navigate to the  Advanced Settings  tab and select  PIO Only  in the transfer mode box for the corresponding device (usually Device 0).
  5. Click  OK  and close all windows.
  6. Test the drive to see if the error message has been resolved.

3.2: Change The Drive Letter

Sometimes, your system could be reading the drive letter wrong, which could also cause input/output errors. Changing the drive letter will resolve the issue. Here is how to do it.

  1. Hit Windows Key and X.
  2. Next, click on  Disk Management .
  1. Right-click on your external drive.
  2. Select  Change Drive Letter And Paths… .
  1. A new box will open. Click  Change  and select an option from the menu.
  2. Click  Apply , then click  Yes  when a pop-up dialog box appears.

Restart your computer with the drive still attached and check if the IO error message reappears.

3.3: Use The CHKSDK Function

If you still encounter input/output errors, it is fairly certain that the problem lies with your drive, not the computer.

Next, we will try to use the chkdsk tool to try and fix our external hard drive.

  1. Press the start key and type  cmd .
  1. Select the  run as administrator  option.
  2. In the  Allow this program to make changes  dialog box that shows up next, click  Yes .
  3. The command prompt (admin) window will now open. Key in  chkdsk H: /f /r /x”  without the quotation marks.

Note: the “H” is to be replaced with the drive letter of your external hard drive. If your external drive letter is “D,” then the command would be “chkdsk D: /f /r /x”.

The chkdsk tool may take a fair amount of time to run. It depends on various factors such as how old your drive is, if it is corrupted or not, how much data it has, how powerful your computer is, etc. If it finds anything wrong with your drive, like bad sectors or file errors, it will attempt to fix those automatically.

Step 4. Advanced Methods

4.1: Perform a Clean Boot

If none of the previous methods resolve the I/O device error, performing a clean boot can help identify whether third-party applications are causing the issue. Follow these steps.

  1. Hit Windows key + R and type in  MSConfig  without the quotes. Hit enter.
  1. Navigate to the window labeled  Services . On some machines, this may be called  administrations .
  2. Click the  Hide All Microsoft Services  checkbox. Again, on some machines, this may be called  Hide all Microsoft Administrations .
  1. Next, click on the  disable all  toggle. Hit  Apply .
  2. Next, click on the  startup  window and select  Task Manager .
  1. Navigate to the  startup apps  pane in Task Manager.
  2. Right-click all services that say  enabled . Click on  disable .
  3. Repeat this process for all apps in the list.
  4. Return to the System Configurator.
  5. Click  OK  and Restart your computer.

A clean boot only allows essential Microsoft services to launch upon startup.

Therefore, if any third-party applications were causing your hard disk input/output error, it wouldn’t be allowed to run.

When to Seek Professional Help

If none of these methods resolve the error, the problem may stem from physical damage or firmware failure. In such cases, professional data recovery services like Stellar Data Recovery can prevent further damage and safely retrieve your valuable data.

How-To-Fix-External-Hard-Disk-IO-Device-Error-YouTube

Why to Opt for Stellar Data Recovery Service?

At Stellar Data Recovery, we have seen many cases where users encountered input/output (I/O) errors on their external hard drives and later realized the error was due to physical damage. When this happens, data recovery becomes a highly sensitive task, and we strongly recommend trusting India’s premier data recovery service provider.

Stellar Data Recovery has over 30 years of experience in recovering data from even the most severely damaged hard drives, including those with mechanical failures, firmware corruption, or scratched platters. The best practice for handling physically damaged drives is to work on them in a controlled, dust-free environment. Stellar houses India’s only ISO-certified Class 100 cleanroom, where experts disassemble and operate on the hard drives. This prevents contamination and protects the delicate read/write heads and platters during the recovery process.

Our extensive donor library contains more than 15,000 hard drives, which allows for precise part replacements (heads, head stack assemblies, spindles, etc.) when required. This is essential because even a slight mismatch in head alignment or firmware compatibility can compromise the recovery. At Stellar, your drive will be handled by expert technicians who specialize in specific hard drive brands and models, ensuring the highest chance of success.

These factors contribute to our industry-leading success rate in data recovery. The first step to getting your data back is to call us for a free consultation, where our executives will guide you through the next steps.

Additional Reading: Why Trust Stellar Data Recovery

Frequently Asked Questions- I/O Device Error

1. Can I/O device error cause permanent data loss?

In most cases, I/O error don’t lead to permanent data loss. The data is often intact but temporarily inaccessible. However, if the error is due to physical damage, there’s a risk of data loss.

2. How long does it typically take to fix an I/O device error?

The time varies depending on the cause. Simple fixes like changing USB ports or updating drivers can take a few minutes. On the other hand, more complex issues including physical damage require professional assistance and take longer.

3. What's the difference between using CHKDSK and professional data recovery services?

CHKDSK is a built-in utility that can scan for and fix minor logical errors but cannot address hardware issues. For severe problems, professional data recovery services are necessary to retrieve your data safely.

4. If my device has a warranty, should I try fixing an I/O error myself?

Attempting self-repair might void your warranty. It’s advisable to check with the manufacturer or warranty provider first.

5. What if an external hard drive repeatedly causes I/O error?

Repeated input/output errors may indicate that the drive is nearing the end of its lifespan. Replacing the drive promptly is advisable to avoid potential data loss.

6. Could a clean boot affect my personal files?

Performing a clean boot is a standard troubleshooting step. It does not affect personal files. It merely restricts the startup of non-essential applications, which can help diagnose the cause of the error.

7. Are IO device error more common in older external hard drives?

Yes, older hard drives are more prone to experiencing IO error. This is due to wear and tear, outdated technology, and potential incompatibilities. Also, IO errors are more rampant among low-RPM hard drives, which could also be a factor.

Source: https://www.stellarinfo.co.in/blog/how-to-fix-the-io-errors-for-the-external-hard-disk-drives/

Monday, January 20, 2025

How is Data Recovered in Professional Data Recovery Lab?

In this guide, we cover the professional data recovery process, from initial media submission and diagnostics to data retrieval in cases of physical and logical damage. We also discuss Stellar's specialized tools, Class 100 Clean Room setup, and stringent data security measures to ensure a seamless recovery experience.

With proliferation of digital devices, digital data creation and accumulation 

is increasing exponentially, and so is the data loss.Stellar® Data Recovery

offers a complete range of data recovery option to recover deleted data 

according to different data loss scenarios. Choose the most preferable 

data recovery option as per your need.Following are some of the common 

situations that might result in data loss from devices such as Laptops, 

PCs, Memory Cards, Pen Drives, and

Hard Drives etc.:

  1. Hard Drive Failure
  2. SSD failure
  3. Broken Laptop
  4. Damaged Mobile
  5. Formatting the drive
  6. Data deletion
  7. SD card, pen drive, and flash drive damage, or corruption
  8. Crashed RAID/NAS/SAN server etc.

The root causes of the above mentioned situations could be logical damages

—Accidental deletion, software related issues, virus attacks, etc. — or physical 

damages. Lost data can be recovered by using a data recovery software, but 

only if the damage is logical and is minor. Also, doing this involves a risk of 

permanent data loss, as you might not know if the damage is logical, physical 

or both—logical and physical. Therefore, it’s a must to identify a right service 

provider who not only can conduct risk-free data recovery, but can also ensure

the privacyand security of your data. It's crucial for you to understand the 

data recovery process in a professional data recovery lab.

Stellar’s Data Recovery Process

  1. Submission of Media
  2. Media Diagnosis
  3. Consultation with Customer
  4. Data Recovery

1. Submission of Media

The first step of the data recovery process is the submission of affected 

storage media at the data recovery center. After receiving the media, we assign 

a unique Job Id to it and submit it to our lab.

2. Media Diagnosis

The technicians use proprietary tools to do a thorough analysis of the affected 

media. Based on the analysis they create a report called the media assessment 

report which essentially contains the following information:

  1. State of media (detectable or non-detectable)
  2. Problem type (Physical failure, logical failure, or both)
  3. Possibility of Data Recovery
  4. Time estimation

3. Consultation with Customer

Our lab technician shares the assessment report with customer service team 

and they forward this to the end customer. The customer service team 

discusses the findings of media analysis on the basis of assessment report. 

They also address all the customer queries.

4. Data Recovery

Post the customer’s approval of quotation and time estimate, we finally 

proceed 

with data recovery. Based on the type of failure—logical or physical—the 

technicians use proprietary tools, innovative techniques, and huge inventory

of resources.For physical failures, the storage media such as hard drives 

require specialized environment i.e. Class 100 Clean Room. Read here,

Importance of Class 100 Clean Room.

Data Recovery: Physical Damage Case

Data loss caused due to physical damages need physical recovery which

is carried out in a controlled environment. Some of the data loss situations

that need physical recovery are:

  1. PC doesn’t detect the hard drive
  2. Issues with head assembly
  3. Physically damaged drive/storage media
  4. Damaged PCB
  5. Scratches on platters
  6. Malfunctioning drive motor
  7. Faulty drive spindle

Data Recovery from Physical Damage Device at Stellar®

Physically damaged storage media, such as hard drive is dismantled in Class 

100 Clean Room lab, where several tasks are conducted to bring it in working

 condition and recover the lost data.

Spare Transplantation

Spare transplantation is an exceptionally complex task as it involves

replacement of damaged part(s) with new one. The first step before we do a 

spare transplantation is to identify right spare for your hard drive from a 

huge inventory that has over 50,000 spare parts of different Hard Drive 

makes and models. With the required spare(s), the data recovery specialists 

fix the damaged hard drive and proceed to the next data recovery step, 

i.e. "Cloning".

Cloning

Cloning is a task which creates an exact, uncompressed replica of affected 

drive on a new drive. Cloning can take minimum 1 day to several days for 

completion, depending upon various factors like scratches on platters, bad 

sectors, ageing etc. Technicians conduct all the data recovery tasks on this

cloned drive.

Data Verification

Post successful recovery of data, we share "file lists" with the customers. We

offer two options to the clients for verification of the recovered data:

1. Either the client could visit the desired data recovery center to verify the 
recovered data.
2. Or we arrange a remote access—for the client, so that he/she could 
comfortably verify the recovered data without visiting the Data Recovery 
Center.If the customer doesn’t approve the recovered data, we redo the 
data recovery tasks. We have a strict No Recovery - No Charge policy*.

Data Delivery

Once the customer approves the recovered data, he/she is required to sign 

the verification and acceptance documents. Thereafter, the recovered data is 

handed over to the customer on a new storage media provided by the 

customer. If the customer wants, he/she could also buy a new storage media 

from us, which comes with a data care pack at a discounted price.

Note:

1. Data delivery is subject to agreed terms of payment.
2. We remove the spare(s) transplanted on the affected hard drive, and give 
the hard drive back to the customer.

Data Wiping

We keep your data with us until 7 working days from the delivery date. This is 

done as a temporary data backup plan for you. After this period, we wipe 

the data beyond the scope of recovery by any means.

Note: Any device, media, and data that remains unclaimed or is left with 

Stellar® with or without full payment until 60 days from the date of signing 

the Media Assessment Form will be disposed of at the discretion of Stellar®

Customer will lose all the rights on the device, media, and data. And Stellar® will 

not be held responsible for confidentiality of the data stored on the unclaimed

device or media.

Data Recovery: Logical Failure Case

Logical failure is related with software issues—applications or OS. You might 

lose data in case of a logical failure, which could be caused by the followings 

amongst others:

  1. Deleted Data
  2. Formatted data
  3. Virus affected data
  4. Ransomware affected data

If the failure is severe, a data recovery software couldn’t recover your data. It 

needs logical recovery by a Professional Data Recovery Service provider like

Stellar® who can recover the data even in the worst cases by using the 

propriety and innovative software, and techniques. The completion time 

of logical data recovery tasks depends upon the number of recovery jobs 

which are under process and complexity of the failure. It ideally takes 1-4 

business days to process a logical job.

Logical cum Physical Cases

As the name suggests, these cases are a mix of both logical and physical 

damage. Data care experts at Stellar® apply both the logical and physical 

data recovery techniques and recover data in such cases.

Stellar’s Data Recovery Lab Overview

All the data recovery cases—physical, logical, and physical cum logical—are

 handled in this lab. The lab has artificially controlled environment, access 

control system, tools, and inventory. The access control system prevents 

unauthorized entry. The tools, inventory, and the controlled environment 

support the data recovery tasks. The lab has different compartments to 

perform different jobs. For instance, it has an ISO certified Class 100 

Clean Room—has much advanced tools, lowest level of airborne particles,

 and a completely different environment in comparison to the other

compartments.

Cases where the media is physically damaged are incredibly complex. 

Data recovery in such cases requires expertise in the domain and good 

infrastructure. For example, to open a physically damaged hard drive, 

Class 100 Clean Room lab is required.

How Does a Class 100 Clean Room Look Like?

Class 100 Clean Room Lab has artificially regulated environment— 

controlled level of airborne particles and controlled parameters such as 

humidity, temperature and pressure etc.—especially for dismantling 

Hard Drives. The lab is ISO Certified and the density of particles sizing 

0.5 or larger is as low as 100 particles per cubic foot of air as against a 

typical air-conditioned office building containing 5,00,000 to 10,00,000 

particles per cubic foot of air. All data recovery experts wear CLEAN ROOM

 clothing (boots, lab coats, bouffant caps, gloves, hairnets, etc.).

This lab not only provides data recovery solutions but also has a humongous 

inventory of spare parts including hard drive heads, PCB boards, platter 

cleaning equipment, etc.

Note: A Class 100 Clean Room Lab is a must to prevent permanent data loss. 

It’s recommended by hard drive manufacturers to open physically damaged

 hard drives in a Class 100 Clean Room.

Stellar® being an ISO 27001 and ISO 9001 certified organization ensures that

 all your data inside our premises is entirely safe and secure.

So the next time you visit a data recovery service provider, just make sure 

that they have adequate infrastructure, and use precise data recovery 

process and techniques to recover your data so as to maintain the data safety 

and security.

Source: https://www.stellarinfo.co.in/kb/data-recovery-lab-process-overview.php 

Friday, January 10, 2025

Stellar Shares Expert Fixes for Boot Device Not Found or Hard Disk 3F0 Error

 Summary: This blog lists down possible issues due to which the “boot device not found” or “hard disk 3F0” error can occur on your system. Also, we list down some simple steps to fix the error. In some cases, the hard disk 3F0 error may ask you to install a new operating system on your machine. Before you decide to reinstall a new OS, you can explore some alternatives listed in this blog. Installing a new OS on your PC should be your last resort.

Causes of the Hard Disk 3F0 Error and Its Variations

Consider the following complaint registered by a concerned user:

The boot device not foun or hard disk 3F0 error indicates that your system is not able to find a boot device. The error may occur due to various reasons, such as incorrect BIOS boot sequence, improperly plugged in hard drive, corrupt hard disk partition, etc. When this happens, you will see one of the following error messages on your screen:

  1. No boot device – insert boot disk and press any key.
  2. Boot Device Not Found. Please install an operating system on your hard disk.
  3. No Boot Device Found. Press any key to reboot the machine.
  4. No boot device is available.

The error messages might be slightly different when you have a hard disk 3F0 error. To know more about what a 3F0 error is, carry on reading.

What Does the Hard Disk 3F0 Error Signify?

The error message Hard Disk 3F0 indicates that the computer’s BIOS or UEFI cannot find a bootable device to load the operating system. It suggests a failure in locating the storage device containing the necessary system files, which can stem from various causes such as hardware malfunctions or misconfigured settings. Resolving this issue typically involves troubleshooting the storage device, BIOS/UEFI settings, or repairing the boot configuration.

Why Does Boot Device Not Found 3F0 Error Occur?

Stellar-Boot-Device-Not-Found-3F0

Error messages such as “HP Boot Device Not Found,” “No Bootable Devices Found,” or “No Boot Device Found Dell” are displayed when the operating system is unable to find the boot sector of the hard drive or the bootable hard disk. Here are the possible reasons for this error:

  • Wrong boot order in BIOS
  • Hard disk connection problem
  • Outdated or misconfigured BIOS
  • Corrupt bootable disk
  • Damaged system files or boot files
  • Corrupt MBR/boot sector in BIOS

Having discussed the reasons behind the occurrence of the “Boot Device Not Found 3F0” error, we will now delve into the methods to resolve this issue.

Methods to Fix Boot Device Not Found 3F0 Error

Follow the methods given below sequentially to fix the boot device not found 3F0 error.

Method 1: Change the Boot Order

Ensure that the hard drive you boot from is in fact bootable. If it’s unbootable, an error message like the following will be displayed: “Boot Device Not Found. Please install an operating system to your hard disk.” In this situation, you can change the boot order in BIOS and let it boot from the bootable device. To do so, follow the steps given below:

1. Restart the computer and then repeatedly press the F10 key to enter the BIOS setup menu.

2. After opening BIOS, go to the boot settings.

  • Notebook Computers: Select Storage > Boot Options.
  • Desktop computers: Select System Configuration > Boot Options.

3. Proceed with the on-screen instructions to change the boot order.

Method 2: Perform Hard Reset

When you reset the device, it forces the system to clear and reestablish the software connections between the BIOS and the hardware. To perform a hard reset, follow the steps listed below:

  • Turn off the computer and remove it from any port replicator or docking station.
  • Disconnect all external devices from your computer and unplug the AC adapter. Remove the battery as well.
  • Press and hold the Power button for about 15 seconds.
  • Then, insert the battery and plug the AC adapter back into the computer.

Note: Don’t connect any of the peripheral devices, such as USB storage devices, external displays, printers, etc.

  • Now, turn on the computer. When the start menu opens, use arrow keys to select  Start Windows  Normally; press  Enter .

Method 3: Restore BIOS to Default Settings

It may be the case that your system is configured to boot from an unbootable disk. In such a scenario, resetting your BIOS will restore it to the last saved configuration. To do so, follow these steps:

  1. Turn off the computer.
  2. Wait for at least 5 seconds and then restart the computer. Repeatedly press the F10 key to enter the BIOS setup menu.
  3. On the BIOS setup screen, press F9 to select and load the BIOS Setup Default settings.
  4. Press F10 to Save and Exit.
  5. Select  Yes , then press  Enter  when asked to Save Changes.
  6. Finally, follow the prompt to restart the computer.

If the computer restarts normally, it means that the issue is fixed. If it still displays the “boot device not found” error message, proceed to the next method.

Method 4: Fix and Rebuild Damaged MBR

If the MBR is damaged or has some other issue, you may encounter the ”Boot device not found 3F0 error.” You can fix it by following the steps below:

  1. Press F8 while booting and check if you can get to Windows Recovery. Once there, go to Advanced -> Command Prompt. If you are unable to do so, you’ll need a bootable ISO.
  2. In the Command Prompt Window, enter the following commands:
  • bootrec /RebuildBcd
  • bootrec /fixMbr
  • bootrec /fixboot
  • 3. Now reboot and check for the error status.

If the above steps didn’t fix the hard disk 3f0 error, you need to perform one more step.

  • Go back to the Command Prompt and type  bootsect /nt60 SYS .
  • If this command doesn’t work, try  bootsect /nt60 ALL . If the hard disk 3F0 error reappears, move on to the next method.

Method 5: Reconnect Your Hard Drive

Reconnecting the hard drive may also help you fix Boot Device Not Found 3F0 error. Follow the steps given below:

  1. Turn off the computer.
  2. Remove the power cable and battery.
  3. Disconnect your hard drive and then connect it back.
  4. Reassemble your computer and turn it on to see if the error persists.

Method 6: Reinstall the Windows/OS in PC

If none of the above methods work, you will have to reinstall Windows on the PC. In order to reinstall Windows on your machine, you can refer to the standard process of installing OS.

Click here: How to install Windows 11 on a new PC

Note: Make sure that you run Windows update to update all software, firmware, and drivers after reinstalling the Windows.

Given above were generic solutions that will work on all systems, irrespective of the brand. Now, let’s take a look at how the hard disk 3F0 error manifests in different brands and their customized solutions.

Similar Issues Across Different Systems

The hard disk 3F0 error is common to all systems. However, the error message might vary depending on the brand. For example, Dell users often see “No Bootable Device Found Dell” on the screen when the system cannot locate a bootable device. On the other hand, HP users might see messages like “No Hard Drive Installed HP” or “Boot Device Not Found HP Laptop,” indicating that the operating system cannot be loaded because the hard drive isn’t detected.

In cases where the system cannot find any bootable devices, it’s essential to troubleshoot the issue by checking the BIOS settings, ensuring the hard drive is properly connected, and updating the system firmware. Additionally, the “Operating System Not Found” error might require you to restore or reinstall the OS to resolve the problem.

For Dell users encountering the ”No Bootable Devices Found” error, the solution may involve a few Dell-specific troubleshooting steps. Here’s how you can address this issue effectively on your Dell system.

Addressing Dell SupportAssist – No Bootable Devices Found

If you’re encountering boot issues on systems other than HP, such as Dell, the approach might differ slightly. For instance, Dell systems might display the message “Dell SupportAssist No Bootable Devices Found,” indicating a failure in detecting any bootable device. To address this:

  1. Check BIOS Settings: Ensure that the boot order is correct and prioritize the proper boot device.
  2. Reconnect the Hard Drive: Securely reconnect the hard drive after powering off the system.
  3. Update BIOS and Drivers: Utilize Dell SupportAssist to keep BIOS and drivers updated.
  4. Run Diagnostics: Use Dell SupportAssist to run diagnostic tests on the hard drive.
  5. Seek Professional Help: If issues persist, contact a professional data recovery service to avoid data loss.

By understanding and addressing these errors across different brands, you can ensure a more comprehensive approach to troubleshooting and resolving boot device issues.

If you have tried all troubleshooting methods and the issue still persists, it’s time to seek professional help. Here’s why contacting a reliable data recovery service provider is crucial.

Contact Data Recovery Service Provider

If you’re still stuck with the Boot Device Not Found 3F0 error, it is possible that your hard drive is damaged. Using hit-and-trial methods in such a situation can cause further damage. Hence, to keep your data secure, it’s imperative to choose the best professional data recovery service provider. Look for companies with a proven track record and reputation for excellence in data recovery. Opt for a service provider that can boast impressive data recovery success rates (close to 100%). Additionally, ensure that the chosen provider operates in Class 100 clean room labs. These labs maintain a controlled environment free from dust and other contaminants, safeguarding your data during the recovery process. Safety protocols should also be a priority, with the service provider employing stringent measures to protect your sensitive information throughout the recovery process. By selecting a reputable and reliable data recovery service provider, you can be rest assured that your valuable data is in capable hands.

Summing Up

There are various reasons that result in the Hard Disk 3F0 error. The methods discussed above provide potential solutions. In cases of physical damage to the hard drive, seeking help from a professional HDD data recovery service provider is essential for recovering lost data and safeguarding extant data. Stellar Data Recovery is the industry leader with a pan-India presence, including data recovery labs in all major cities of India. (Find Data Recovery Center near you.)

If you’re facing any issues with your hard drive that are not addressed here, or if you need further guidance on related topics, check out these resources:

  1. For solutions on ATA/SATA hard drive detection issues, explore our guide: Fix ATA/SATA Hard Drive Not Detected in BIOS.
  2. If your external hard drive shows the wrong capacity, you can find troubleshooting steps here: Why the External Hard Drive Shows the Wrong Capacity?
  3. For advice on fixing hard drive error codes, refer to: Fix Hard Drive Error Code 0146.

FAQs

1. What is BIOS?

BIOS (Basic Input/Output System) is the firmware embedded in a computer’s motherboard. It facilitates hardware initialization and allows communication between the operating system and hardware components during the boot process. It stores essential settings for system configuration and startup.

2. What is Disk Error 3F0 on HP Laptop?

The Hard Disk Error 3F0 on an HP laptop indicates that the system cannot find a bootable device, often due to issues such as misconfigured BIOS settings or hardware failures in the hard drive. Troubleshooting involves adjusting BIOS settings and checking hardware connections.

3. What causes 3F0 error?

The 3F0 error may arise from an incorrect BIOS boot sequence, hardware problems like loose connections or a faulty hard drive, or corrupted bootable disks or system files. Resolving it often involves adjusting BIOS settings, checking hardware connections, and repairing or reinstalling the operating system.

4. How do I select the boot drive in BIOS on an HP laptop?

To select the boot drive in BIOS on an HP laptop, restart the system and press the designated key (often F9 or F12) to access the boot menu. Then, choose the desired boot device from the list displayed.

5. How do I fix the error 3F0?

To fix the 3F0 error, adjust BIOS boot order settings to prioritize the correct boot device and ensure proper connection of the hard drive. If the issue persists, consider troubleshooting hardware problems or seeking the help of a professional data recovery service.

6. How can I prevent the occurrence of the 3F0 error in the future?

To prevent the 3F0 error, regularly update BIOS firmware and drivers, maintain proper hardware connections, and implement data backups to mitigate potential data loss in case of hardware failure. Additionally, periodically check system health indicators and address any warning signs promptly to avoid future issues.

Source: https://www.stellarinfo.co.in/blog/how-to-fix-boot-device-not-found-3f0-error/